

What Is The Best Program To Clean Your Computer
Tabular array of Contents:
- Introduction
- Tools and Materials Required
- Electrical Precautions
- Static precautions
- Dust Precautions
- Setting Up
- Opening the Case
- Cleaning the Interior
- Floppy Drive, Optical Drives and Hard Drives
- Cheque the Fan Rotation
- Reassembly
- Conclusion
Introduction
Nearly people think computers, being electronic devices, don't require any mechanical maintenance, but this is not so. Many figurer faults are caused past components overheating due to poor airflow in the case because of a buildup of clay and dust over time. It'south worthwhile cleaning your reckoner annually or even more than frequently if it is in a specially dusty environs, on carpeting or in a household with pets. This tutorial is designed to help you safely clean the interior of your tower or desktop PC and then as to maximize its lifespan. No estimator knowledge is assumed other than familiarity with component names. Cleaning the computer is non rocket-science and does not require whatever special skills or tools only yous do need to know how to avoid possible damage to some of the more sensitive parts. That's what we will demonstrate here. Although the same principle applies to laptops and notebook PCs, considering of the difficulty dismantling them these instructions do not apply to those types of estimator.
 back to contents
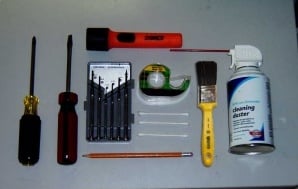
Tools and Materials required
- A No.2 Philips cantankerous-head screwdriver.
- A small flat-bladed screwdriver.
- Ane can of compressed air (more if you lot doubtable the PC is really filthy)- from you local supermarket or electronics/computer store.
Do NOT utilise compressor air - it often has a high moisture content which will cause corrosion
and may incorporate aerosol lubricants which can crusade electrical shorts. - Five or half dozen kitchen paper-towels or napkins to wipe down the example.
- One pocket-size paintbrush with long natural bristles. 1/2inch(12mm) size is ideal.
- One parcel of Q-Tips or Cotton Tips.
- 1 Window/Glass Cleaner spray pack.
- A short length of insulating record.
- One plain Pencil at least 4"(100mm) long.
- A pair of Pair of scissors.
- A flashlight.
- An sometime Newspaper.
- A Vacuum cleaner with a hose and nozzle (if available).
Optional Items:
- A dust mask - from your local hardware store.
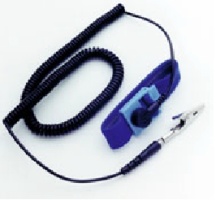
- A Static Strap - from your computer store or possibly supermarket.
- One 3volt Battery type CR2032 or equivalent.
- Assorted coloured stickers.
- A CDROM Lens cleaning deejay - bachelor at computer stores or supermarkets.
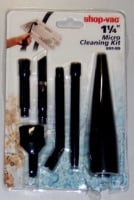
- Micro cleaning kit - Vacuum cleaner nozzle attachments.
back to contents
Electric Precautions
Inside the computer is completely safety with one exception - the ability supply or PSU. The PSU is in its own metal box usually at the top rear of a tower (at the rear of a desktop) and you should NEVER endeavour to open up this box or stick anything metal into it. At that place may exist an on/off switch at the back of the PSU and there may be a (red) voltage selection switch. Do NOT change the voltage option switch. Older computers accept power at the on/off switch at the front of the case, identified by a thick electrical cable linking the switch to the PSU. Do not attempt to disconnect this cable from the switch. back to contents
Static Precautions

The greatest danger inside the tower is of you "electrocuting" the calculator through discharge of static electricity that builds upwards on your body or clothing. Static is especially a trouble during dry out weather condition and if you lot have constructed carpets or vesture. For example a synthetic pullover (sweater) would be a bad choice of garment for this job, a short sleeved cotton shirt would exist a much ameliorate choice. The best way to gainsay static while cleaning your reckoner is to wear a static strap fastened to the chassis and worn on your wrist during the whole process. Disposable static straps are available for a few dollars, professional versions may cost $xxx-40. Alternatively if you lot can maintain proficient contact betwixt yourself and the metal chassis for most of the cleaning process and endeavor not to move around too much and so that will exist acceptable without a strap.
dorsum to contents
Dust Precautions
Computers make pretty practiced grit collectors and if yours is normally placed on or virtually the flooring (especially carpeted floor) or if you have pets, are a smoker, or the reckoner is situated in a high pollution area there could be a lot of dirt trapped in the system. When y'all blow this out with the compressed air it will be spread through the room. You should piece of work with good ventilation and if you endure from allergies you should consider wearing a grit mask. back to contents
Setting Upwards
Shutdown the computer and disconnect all the cables plugged into it (you lot may want to marker the cables and the ports they came from with coloured stickers to help you when putting your computer back together again). Yous may need the flat-bladed screwdriver to undo some of the connector screws. Put newspaper down on your piece of work surface so it doesn't get scratched. Locate your worksurface near a power outlet (power point) and plug in the computer ability cord (y'all don't need to switch it on). Put the computer on your work surface and connect the ability cord to the computer but practice not plough it on. Gear up out your tools and materials then you do not need to move around much to accomplish them during cleaning. Starting almost two inches (50mm) from the blunt end of the pencil spike insulating tape down the length of the pencil to the edgeless end and cutting the tape two"(50mm) across the end of the pencil. Shine the tape effectually the pencil then fold the excess length over the blunt terminate and up the other side. Printing the record down and so it is firmly stuck to the length of the pencil. back to contents
Opening the Example
The standard tower case commonly has either a unmarried metal embrace roofing the top and both sides, held in place past three or 4 screws or has removable side panels each held in place by two screws.
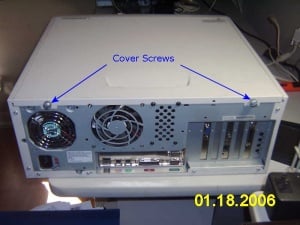
Utilize the Philips screwdriver to remove the three or four screws holding on the embrace(southward) and put them aside where they will not be lost. Remove the cover(s) and put them to one side but within attain. If you are using a static strap put information technology on your wrist and adhere it to a metal role of the chasis, if you do non accept a static strap touch on the metal of the chasis with both hands. Then remove the ability string from the back of the computer. back to contents
Cleaning the Interior
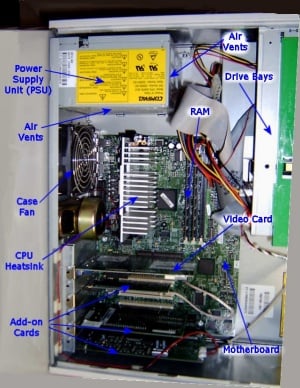

- Example vents and PSU vents Run the vacuum cleaner nozzle over any air vents at the front, side and rear of the instance and over any vents in the PSU peculiarly the air vents in the sides of the PSU inside the computer. If the covers have vents then vacuum those every bit well.
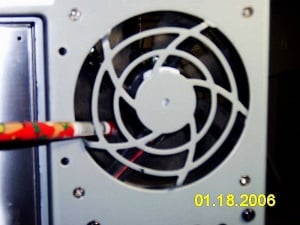
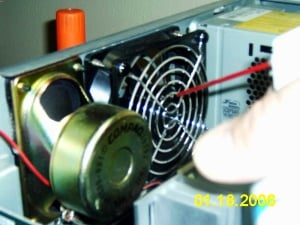
- PSU fans Apply the blunt, insulated end of the pencil to agree the fan blades steady and blow compressed air into the PSU fan(southward) and through the PSU. Significant dust may be ejected from the power supply .
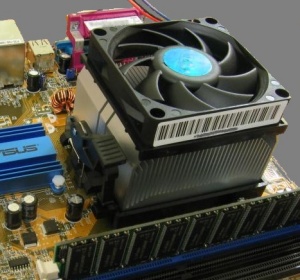
- CPU fan and heatsink This is the most important part of the cooling system - dirt collects on the fan blades and clogs the heatsink vanes. Use the paintbrush to brush the dirt off each blade and off the heatsink vanes if accessible. Using the pencil to concord the fan blades still, accident out the fan and the heatsink with the compressed air. Information technology is of import not to permit the CPU fan (or other fans) spin up under the air boom as damaging voltages can be generated through a dynamo effect. Expect significant dirt to exist ejected from the CPU heatsink. If yous want to be particularly thorough moisten a Cotton-tip with glass cleaning fluid and wipe down the upper and lower surface of each fan blade.
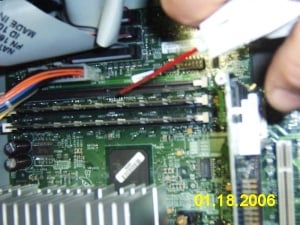
- RAM Sticks and Expansion Slots Dirt can sometimes build up in 'drifts' around the memory sticks and the video, sound or modem card slots. Apply the compressed air to blow it out. Exercise not employ the brush here.
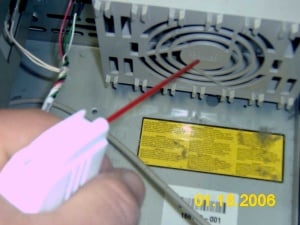
- Case fans Cases frequently have 1 or more than fans attached to the front end or rear panels. Using the pencil to stop fan rotation blow the dirt from the case fans with the brush and compressed air.
- Video card fan and heatsink This can exist hard to see as information technology is unremarkably on the lower side of the video card. Depending on the pattern either apply the paintbrush to remove dirt from the heatsink and/or utilise compressed air while belongings the fan still with the pencil. To practice a thorough job will probably require removing the Video Card which is unremarkably held in identify with i screw where information technology meets the instance. Remove the screw and unplug the bill of fare past pulling firmly outwards. In that location may be a plastic latch at the back of the card, press down on this to help eject it. If you do remove the video card go along good contact with the PC chassis equally often as possible to minimise static buildup and remainder the video bill of fare on office of the example while it is being cleaned. When the fan is clean utilise compressed air to blow out the video carte du jour slot, on older cards if the border connectors of the bill of fare look tarnished make clean them lightly with a pencil erasor. Reinsert the video bill of fare making certain the plastic latch clips into place indicating the card is properly seated in the slot (non all systems have a latch). Then practice upwards the spiral.
- The case Vacuum the dust from the bottom of the case being careful to go on the nozzle away from the motherboard. Spray some paper towels with glass cleaner and wipe down the flat metal surfaces of the case and the within of the cover(s).
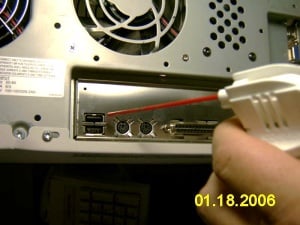
- The Ports Dust often accumulates in the I/O Ports where yous plug in peripherals on the back of the computer. Use the brush and compressed air to make clean them out.
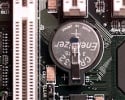
- CMOS battery Although this is not a cleaning process, if your PC is more than than a couple of years old this might be a good time to alter the CMOS battery - usually a round, silver-coloured button bombardment e.g. Energiser CR2032 Lithium 3v. The battery 'pops' out of its holder with a little pressure on the side near the clip and the replacement slips in. Note: Irresolute the battery may reset some BIOS options to factory defaults and so If you lot take circuitous BIOS settings considering of SATA drives, USB keyboards, RAID controllers or network parameters for case it would exist best to note down all the settings before changing the bombardment and check for changes afterward.
dorsum to contents
Floppy Bulldoze, Optical Drives and Hard Drives
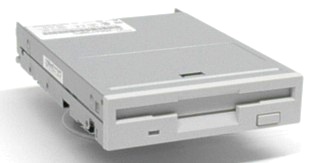
Floppy drives tin can collect a lot of dust which could forbid them from working properly. Push the nozzle of the compressed-air tin a piddling way into the drive opening so that the flap is held open, or use Cotton-tips to hold the flap open broad, then use the compressed air to accident out the grit. In that location are special floppy cleaning disks available which are used to clean the floppy drive read/write heads just these are oftentimes more expensive than replacing the drive and are only needed if the bulldoze is quondam or gets very heavy usage.
The CDROM drives or DVD drives are unlikely to be chock-full by dust simply they may collect dirt on the optical lens which can cause errors. Utilise the CD lens cleaning deejay following the manufacturer'south instructions to clean the lenses on these drives - this has to exist done when the PC is operating.
Hard Drives are sealed units and require no cleaning, but to maximise the air-menstruum around them utilise the compressed air to blow abroad whatever dust from the drive's upper surfaces. dorsum to contents
Check the Fan Rotation
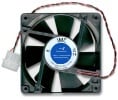
Connect your PC power cable once again and switch on the PC, while information technology is open, for merely long plenty to encounter that all the fans you identified above are spinning. Fans which do not spin turn into miniature heaters which makes the state of affairs worse than without a fan. If you lot find a fan which is not working so, after turning off the PC, note what kind of fan it is, where it is and, if possible, unplug it. Y'all can probably social club a replacement online or they may have stock in your local reckoner store. If the CPU fan is not working then you should not run the estimator for more than a few minutes until it is replaced. If the PC has started to boot while y'all were inspecting the fans and is reluctant to plough off, just hold the ability button in for almost v seconds and the PC will switch off.
back to contents
Reassembly
Make sure nothing has been left inside the case and nothing is probable to get caught in the fans. Any cables that were moved to get access to other items should be put back in identify. Inspect the cables going to the optical drives, floppy drive and hard drive(s) to check none have been dislodged. Put the cover(s) dorsum on the organization and practice up the screws to concord them in place. Unplug the power cablevision and return your PC to its normal location. Connect up all the cables that were originally nowadays (following the colour code if ygu used information technology) and reconnect the ability cable. Plug into the ability outlet and switch on. Make sure your monitor is switched on and check the estimator boots up normally. Now you lot can utilise the CD lens cleaner if required. back to contents
Conclusion
Nosotros promise this tutorial has shown you lot that, with a little knowledge and a few bones tools, cleaning the inside of your estimator is a simple, hazard free procedure. Following the higher up steps should have enabled you lot to successfully clean your figurer so that information technology can go along to run every bit efficiently as it was originally designed to practise.
A collaborative effort by Acklan and Rimmer January 2006.
https://www.bleepingcomputer.com

Source: https://www.bleepingcomputer.com/tutorials/cleaning-the-inside-of-your-pc/
Posted by: hadleywatme1975.blogspot.com
0 Response to "What Is The Best Program To Clean Your Computer"
Post a Comment